THIS POT IS FOR YOU
By Phyllis Elmore/Victoria County Master Gardener

PHOTOS BY PHYLLIS ELMORE
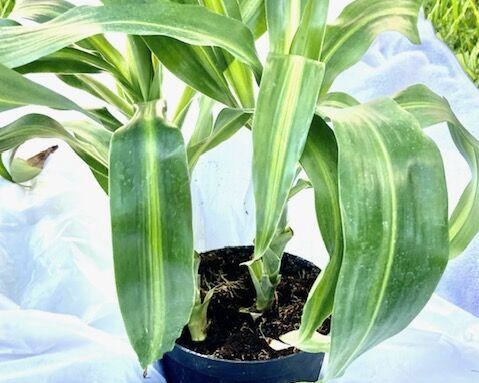
Time to repot plants.

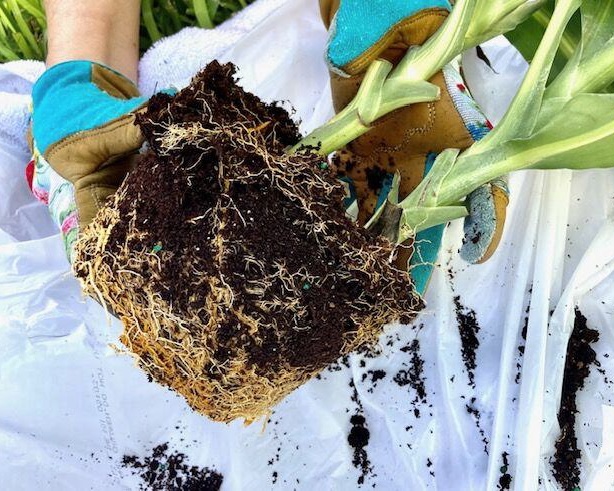
Repot your plants when the roots are wrapped around the soil.

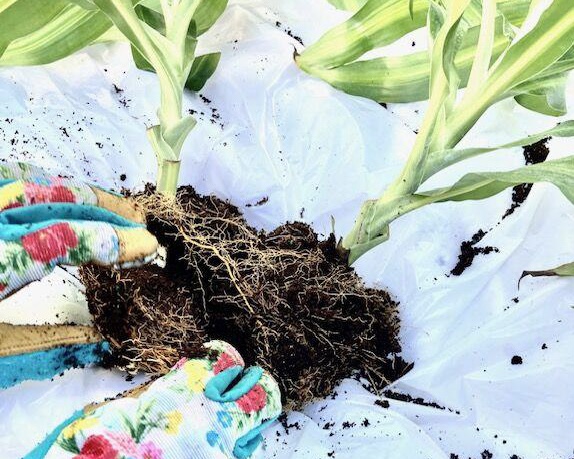
Separate the two plants by the roots.

Once repotted, the plants will have room to grow.
Do you like to save money? Are you frugal? Have you been called cheap? Well, listen up friend. I am going to show you how to get a big showy look for little money. You can do this by using what you may have around your house.
A very long time ago, before I was a Master Gardener, almost as far back as when dinosaurs roamed the Earth, I worked in a florist shop. FYI that is sarcasm for people that cannot recognize a joke.
Anyway, the new plants we received to sell dismayed me. It seemed to me that the plants were in need of repotting. I learned the nurseries grow the biggest plant in a smaller pot to keep their costs down. Although the plants looked full and gorgeous, they would need some TLC.
If you have any houseplants or even outdoor potted plants, they may need some TLC also. How do you know? There are many signs to notice.
First off, do you see roots coming up to the surface?
Second, is your plant root bound? Are the roots wrapped around the outer edges of soil?
Third, is there residue on the top surface of the soil?
Fourth, is your plant so big that you are not able to see the container?
Fifth, do the tips of the leaves curl under or turn brown?
If you answered yes to any of these questions, you have come to the right place. It is time to repot your plant. Fear not, it does not take a lot of time, energy or money to achieve your goal of renewing your plants.
Before we get down and dirty, we will need some supplies. I would start this activity outside or use a tarp to minimize the mess. First, you need an overgrown plant.
Second, your plant requires a bigger pot or container. I like plastic because it does not absorb the water. It is lighter than clay or ceramic pots. If the container does not have drainage holes, you will need rocks or clay shards to give drainage. Or drill holes into the pot. It will give you a better result.
Next, you will need new potting mix. I prefer the type with the fertilizer mixed in. Then, to protect your expensive manicure, find some gloves. Lastly, you will want garden shovel or spoon to make the process easier.
Here comes the fun part. You must remove the old plant from the pot. If the plant does not lift out easily, turn the pot on its side and whack it on the side and bottom. Yes, you read that correctly. Hit the pot with your shovel to loosen it. It is great therapy to take out your frustrations on your recalcitrant plant.
If your container is breakable, skip that part and dig the shovel around the edges to get the plant to come out.
Now gently work the roots free. Put some of the new potting mix into the larger pot. Set the plant into the pot. Fill in the pot with the potting mix. You don’t need to pack it in hard. However, you do need to add it near the top of the container.
My rule of thumb is to leave a 1/2 to 1 inch of pot showing to have room for water.
Finally, thoroughly water your plant. You may decide you should add more soil. Go ahead and do so if the soil level is low.
Guess what? You are done. Wasn’t that easy? Your plant will enjoy the new larger container. The next time you have to repot a plant, you will be a pro.
REFERENCES
Step-by-step Guide: How to Safely Repot Houseplants
The Gardeners’ Dirt is written by members of the Victoria County Master Gardener Association, an educational outreach of Texas A&M AgriLife Extension – Victoria County. Mail your questions in care of the Advocate, P.O. Box 1518, Victoria, TX 77901; or [email protected], or comment on this column at VictoriaAdvocate.com.