Vertical Gardening: Potato Towers
By Kristin Bingham
 Have you been looking for something new to try this spring? Do you enjoy those fresh from the garden delights, but struggle to incorporate them into your meals? Potatoes are a relatively easy to grow crop that the whole family can enjoy, and can be grown vertically in your smallest spaces. As one of our earliest plantings in the South Plains College garden, they are a fun way to welcome the growing season. Traditional potato plantings require long rows of mounded soils that the plants grow out of. This method takes those long rows and stack them, resulting in a much more productive use of space as well as an eye-catching garden feature. You can typically begin planting your potatoes around the last frost, but if
you’re chomping at the bit, you can get them into the soil as early as the beginning of March – just be aware you may suffer some frost damage if temps drop abruptly.
Prior to planting, seed potatoes can be cut into sections, each with one to two eyes. Generally, I try to end up with at least one-inch cubes of flesh with the eye(s). These sections are then left to set for 24-48 hours so that the cuts can heal over. This prevents the sections from rotting once planted. If your seed potatoes are very small, you can leave them whole and plant them directly.

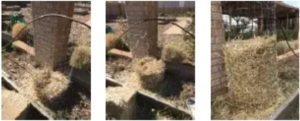
To build the towers, we constructed cages using four-foot lengths of rolled fencing wire with one-inch openings, shaped into tubes and fastened with wire. I’ve reused these cages for three years without any issue. Once I’ve decided where I want to grow for the season, I place my cages and stake them down with landscape staples. You can also use rebar, bricks,or anything else you have around the garden to weight down your cages.


Into the cages will go straw, soil, and a sprinkling of compost in alternating layers. I like to start with a 6-8 inch layer of straw. Push the straw to the edges of the tower, and then you’re ready to build up. You’ll add about 4 inches of soil next, concentrating most of it at the center of the tower. I add a handful of compost, distributing it over the soil. Place your seed potatoes in a circle, nestling them in to the soil layer. You want to be sure that the eye of your section is facing out toward the openings of the fencing. Try not to crowd your potatoes – the more space they have, the larger they’ll grow. After you’re satisfied with your first layer, water soil thoroughly, and then add another six inches of straw, followed by four inches of soil, a bit of compost, and seed potatoes. You’ll keep doing this all the way up to the tower. Be sure you finish with straw on top and water regularly. I typically run an irrigation line across the top of the towers to automate watering and to ensure water availability for plants throughout the structure. Shoots will begin to grow out of the tower,and harvests can begin in 10 weeks for new potatoes, 15 weeks for more mature tubers.
You’ll know your potatoes are ready to harvest as the tops of the plants dies back. You can harvest potatoes one layer at a time or wait until the whole tower is ready, then lift up and shake to release all of the potatoes for a single harvest.
This makes for a fun “treasure hunt” with the little gardeners in your life. After harvest, the straw and soil mix can be left to compost in place, added to a bin, or turned into the soil I hope you’ll try this technique in your own growing spaces this year and please, share your photos and tips with us on the Lubbock Master Gardeners Facebook page.