• Skip to primary navigation
  • Skip to main content
  • Skip to primary sidebar
  • Texas A&M Forest Service
  • Texas A&M Veterinary Medical Diagnostics Laboratory
  • Texas A&M AgriLife Extension Service
  • Texas A&M AgriLife Research
  • Texas A&M College of Agrculture and Life Sciences
Somervell County Master Gardeners
Somervell County Master GardenersTexas A&M AgriLife Extension Service
  • Menu
  • Home
  • About
  • Contact Us
  • AgriLife Extension Service
  • News
  • SCMG Gardening Resources
  • Members Only
    • Members Hour Form
    • Meeting and Financial Documents
    • Constitution and By- Laws

Homemade Weed Killer

May 3, 2015 by lheideman

by Joan Orr, Somervell County Master Gardener

If you have large areas of weeds that you want to get rid of, this recipe is for you. It will kill any vegetation it comes in contact with. Care must be taken to spray only the weeds you want to kill, avoiding spraying lawns and flowers.

Homemade Weed Killer 1 gallon distilled vinegar
1-cup household salt
1 tbsp dish detergent
Spray bottle

Mix all ingredients in large kettle and heat over medium heat until the salt is completely dissolved. It is not necessary to boil the solution. Set aside to cool. Pour in spray bottle and get to work!

**Before you apply this weed-killer in your garden, here are some guidelines:

– This weed-killer is non-selective, which means that it will also damage/kill your desirable plants. So be careful when applying to weeds.
– Apply on a sunny day with NO wind.  The sun helps the vinegar to dry out the weed.  You also want to wait for a windless day so that your spray won’t inadvertently spray onto other plants.
– This weed-killer may or may not kill the root of the weed.  You may need to reapply it if green growth shows up afterward or pour a little of the weed-killer over the root zone to thoroughly kill large weeds
So, next time you need to kill weeds, simply open your cupboard and make your own with vinegar, salt and soap.  It’s natural, effective and cheap!

Filed Under: Gardening Tips, Newsletters

Other Uses For Eggshells

March 29, 2015 by lheideman

by Linda Heideman, Somervell County Master Gardener

article-new-thumbnail-ehow-images-a06-je-9e-pulverize-egg-shells-800x800While decorating eggs for the grand kids’ big Easter egg hunt next week,  I was reminded that eggshells do more than just hold an egg together!  I have tried these ideas, and they really do work!

1. Add crushed eggshells to the bottom of planting holes, especially for tomatoes, peppers, and eggplant. These crops are susceptible to blossom end rot, which is caused by calcium deficiency. While this deficiency is most often caused by improper watering, there’s no harm in making sure your plants have a steady source of calcium. As the eggshells break down, they’ll nourish the soil, and your plants.

2. Use eggshells as pots for starting plants from seed. Then plant the seedling, “pot” and all, into the garden.

3. Use crushed eggshells to deter slugs, snails, and cutworms. These garden pests are a real pain in the gardener’s neck, and cutworms are the worst, killing seedlings by severing the stems at soil level. All three of these pests have soft undersides, and dislike slithering across anything sharp. Crushed eggshells, applied to the soil’s surface, may help deter these pests.

4. Add them to the compost pile. If you aren’t planting tomatoes or trying to deter slugs, add the eggshells to your compost pile, where they’ll add calcium to your finished compost.

5. If you are feeding birds in your yard, crush up the eggshells and add them to a dish near the feeder. Female birds, particularly those who are getting ready to lay eggs or recently finished laying, require extra calcium and will definitely appreciate it!

No matter how you want to use them, be sure to rinse the shells out well before using them in the garden.

Filed Under: Gardening Tips, Newsletters

Know Your Soil

January 2, 2015 by Donna Hagar

By Kathy J Gosdin, Somervell County Master Gardener

Happy New Year to you all! If you have recently purchased your property, have became interested in tilling some dirt to plant a tree or need to figure out why things just don’t grow or produce the way you would like, you may find it beneficial to have your soil tested. Obtaining a nutrient analysis of your soil helps you to know how to properly amend it.

soilsample
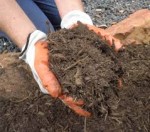
Testing for nutrients in the soil may be done through Texas AgriLife Extension Service Soil, Water and Forage Testing Laboratory. You may get an analysis from any lab of your choice but know if you send the soil sample to a commercial laboratory instead of the one at Texas AgriLife Extension Service, be sure to use an agronomic soil testing laboratory, not an environmental soil testing laboratory as most environmental laboratories are unfamiliar with agronomic soil testing and therefore may not make nutrient recommendations. Soil bags for sample collection and information sheets are available from your county extension office or line at http://soiltesting.tamu.edu/files/soilwebform.pdf .

There is a cost for the test and you do have to send it to the Lab, but the information you gain could give you the knowledge you need to have the success and enjoyment of watching your plants thrive.

Just know the accuracy of the soil analyses will be a reflection of the quality of the sample you have taken. It is recommended that a good representation of the area be gathered. Here are some steps to follow:

  1. Use clean tools to retrieve the sample. Chose 10 random areas to a depth of 6 inches. Areas to avoid would be manure or compost piles, under eaves or near gavel roads or brush piles.
  2. Place the samples into a clean container and thoroughly mix them.
  3. Retrieve about a pint of the mixed soil placing it into the bag from the county agent or you may use a zipper-lock sandwich bag, just be sure to double-bag that sample if you do.
  4. Number the samples if you send multiple. Also identify the samples so that you know where you got them from. Two labels per sample is also good in case on gets messed up.

This procedure should be done for each area that you wish to get analysis on and if the area is small you may collect as few as three samples to mix up to obtain the one pint to send in.

As we mention so many time mulch and compost do so much in the way of improving your soil. Whether it be sandy loam or clay. Microorganisms are needed in your soil to help break down the nutrients your plants will feed on.

The nutrient analysis will return to you with results of levels and recommendations of fertilizer to use.

Knowledge is useful, correctly applying knowledge is wisdom

– may you be a Wise Gardener/Yardener.

Sources: Doug Welch’s Texas Garden Almanac

                 Texas Master Gardener Handbook

Filed Under: Gardening Tips, Newsletters

December Gardening Tips

December 7, 2014 by lheideman

by Bonnah Boyd, Somervell County Master Gardener

*Cover flower and shrub beds with from 3 – 4 inches of mulch to prevent moisture evaporation and to modify soil temperatures.

*Clean out warm-season flower beds, add an inch or two of compost and mix it into the soil.

*Water the entire landscape at least once in December in the absence of significant rainfall to prevent freeze damage.

*If a hard, prolonged freeze (24 hours or more) is predicted, cover freeze-sensitive plants with cardboard boxes or blankets.

*Move tender container plants indoors near a very bright window to keep them healthy through the winter.

*Mow winter weeds to keep them in check.

*In areas of the vegetable or herb garden that are void of plants, pull winter weeds and plant a cover crop, such as cereal rye grain.

*Cover crops reduce weed establishment and can be tilled into the soil later to improve the soil.

*Use leaves from the trees to build a compost pile or as walkway materials. Continue to add leaves to the walkway as they press down with foot traffic.

*Remember to provide water for the birds during winter.

*This is a great time to plan next year’s gardens. Try some new things.  Add a new “feature” to your garden.


Filed Under: Current Newsletter, Gardening Tips, Newsletters

November Gardening Tips

November 2, 2014 by lheideman

by Linda Heideman, Somervell County Master Gardener

Ah!  November!  The weather is cool, flowers are blooming in season, the leaves on the trees are starting to turn.  It is truly fall!  Winter and Thanksgiving are on the way.  Time to get ready, but don’t forget there’s plenty to do in the garden!

1st week:  Finish dividing spring-blooming perennials.  Plant pansies (my favorite), ornamental cabbages, kale, snapdragons and dianthus.  Prepare to protect tender plants – average first freeze is November 21.  Pansies-150x150

2nd week:  Cut back fall-blooming perennials as they finish blooming, and finish mulching all beds.  Fallen leaves can be used in mulching your beds and/or added to your compost pile.

3rd week:   After a killing freeze, cut back freeze-damaged perennials such as chrysanthemums, lantana and cannas.

chrysanthemum

4th week:    After a hard freeze transplant established trees and shrubs.  Mulch and water them well.  Hardy, ornamental grasses can be cut back and divided after a hard freeze.


Filed Under: Gardening Tips, Newsletters

Ahhhhh! October Gardening Tips

October 5, 2014 by Donna Hagar

by Donna Hagar

As the days get cooler and chances of rain return, we are all finding it to be far more enjoyable to be back in the garden. If you are like me, there are some chores that need to be done, as well as some fun things to get excited about!

First and foremost, if you haven’t cleaned up your summer veggie garden, now is the time to do so. Any dead or spent veggie plants can go straight to the compost, if they aren’t diseased.

chard

Colorful and Edible Swiss Chard

If you are wanting some fall crops, there is still time but you will need to get on it PDQ. Add compost to your garden and work it in the top few inches. There is still time for root veggies – beets, carrots, radishes, turnips and parsnips if you lean that way. Also greens such as collards, kale, lettuce, mustard, spinach and Swiss chard. Maybe now you will want to try some Chinese cabbage varieties, bok choi, tat soy or pak choi. And of course, get the garlic in! And as most people are unaware, cilantro is a cool season plant, so it goes in now, too.

Veggies not your thing? How about annuals for color? Pansies can go in, as well as pinks, dianthus, ornamental kale, snapdragons. Don’t forget, Swiss chard comes in many colors and withstands the winter quite well. If you haven’t eaten it before, give it a try! Mix some in with your landscape and save a trip or two to the grocery store for veggies! Spring flowering bulbs, daffodils and narcissus go in this month.

Fall is actually the ideal time for planting container grown trees and shrubs and many perennials. Getting them in now gives them several months head start to get their roots established before the spring growth and hot, dry summers next year.

Divide those perennials now, as well. Daylilies, iris, oxeye and Shasta daisies, coreopsis, purple coneflower all will handle a fall transplant or being passed along to some favorite friend. Leave ornamental grass inflorescence for fun winter color. Trim just before spring growth begins.

WildflowersThis is your last chance to get wildflower seeds out as well but get to it quick. Make sure there is good seed to soil contact for best germination. Fall rains and Mother Nature should take care of the rest.

And last but not least, mulch, mulch, mulch! Get a new 2-4” fresh layer of mulch on all those existing beds to protect it from potential early freezes! (Don’t cover seeds in the garden tho or they won’t sprout!) It also helps retain moisture thru the winter and prevents weed seeds from germinating. Just be sure to water those beds good before adding the mulch.

Filed Under: Gardening Tips, Newsletters

Tips for August

August 3, 2014 by lheideman

by Linda Heideman, Somervell County Master Gardener

For the lawn and beds:

  • Make sure the lawn is getting about 1-1.5 inches of water every week, watering between 2a.m.-6a.m. is ideal.
  • Keep lawn mowed and landscaping weeded to prevent an infestation of chiggers.
  • purslane-01-300x225
  • Plant heat loving plants such as salvia, purslane, and portulaca.
  • Water potted plants and baskets often – twice a day on triple digit days.
  • Give plants a summer boost by fertilizing throughout lawn and beds.

For the garden:

  • Check the garden daily and harvest veggies regularly for the best tasting and tender vegetables.
  • All month long: Sow black-eyed peas, parsley, Swiss chard, and collards.
  • Beginning of the month: Sow bush and pole beans, Irish potatoes
  • Middle of the month: Sow cabbage and head lettuce.
  • End of the month: Sow kale, spinach, and turnip seeds.
  • Turn your compost pile.

Copied from the website of Ideal Partners Landscapes, Fort Worth

Filed Under: Current Newsletter, Gardening Tips, Newsletters

Dog Days of Summer

July 6, 2014 by lheideman

by Bonnah Boyd, Somervell County Master Gardener

This phrase refers to the sultry days of summer.  In the Northern Hemisphere the dog days of summer are most commonly experienced in the months of July and August.

The phrase has an ancient astrological origin.  The Romans noted that the brightest star, Sirius in the Big Dog constellation (Canis Major) was lined up with the sun during the hottest time of the year.  This conjunction was believed to cause the peak heat of summer.  The Old Farmers’ Almanac lists the traditional period as the 40 days beginning July 3 and ending August 11.

Many events are often planned during the “Dog Days”.  These include dog contests and pictures, parties, sports tournaments at the beach, baseball games and tours, with or without your dog.

If you plan a summer vacation during this time, don’t forget the plants, both indoors and out.  Below is a checklist of activities to do for your garden and plants prior to leaving.

Water:   Irrigate landscape and garden thoroughly.  If you have a vegetable garden, have a neighbor water, as needed.  Many containerized plants need watering at least every third day to survive the heat.  Group containers together in easy reach of the water hose. 

Mow:    Mow and trim your lawn the day before you leave.  The lawn may need to be mowed a week later, so either be home then or make arrangements for weekly mowing.

Weed:   Pull, spray or mulch over existing weeds in the garden and landscape.

Prune:   Check roses, perennials and annual flowers to determine if they need deadheading.

Mulch:   Mulching preserves water in the soil, reduces soil temperatures, reduces weed populations and gives a fresh look to the garden.

Do a pest check:   Check for insects and diseases.  Take action to control populations of insects pests that are present.  Diseases are less prevalent in the summer, but check for fungal diseases, such as black spot and blight.  Apply a fungal spray as needed.

Harvest:   In the vegetable garden, harvest all ripe and nearly ripe fruit.  Call a neighbor to come harvest for you, if you are going to be gone for more than a week.

Reference:  Doug Welch’s Texas Garden Almanac     

Filed Under: Archived Newsletter 2013-present, Gardening Tips

Timely Tips for June

June 7, 2014 by Donna Hagar

by Donna Hagar, Somervell County Master Gardener

Ahh, wasn’t all the rain we got in May just wonderful? Everything greened up and flourished. You could tell the trees, grass and shrubs were heaving a huge sigh of relief! This is a great time to want to sit back and really enjoy our lush and thriving landscapes. But what if that was it? What if the rains will be fewer and farther between? What can we do to keep our trees, plants, gardens and lawns happy?

mulchFor starters, MULCH! This is something we Master Gardeners push very hard, as it makes such a difference in retaining moisture and keeping weeds at bay. And I’m not talking a scattering or just top dressing of mulch. More like 3-4 inches thick. Just make sure the soil underneath is good and moist before you load that much on top. If you have drip irrigation or soaker hoses, place these under the mulch, as it takes quite a bit of water to get thru that thick layer of mulch. When you do water, you want to make sure you are actually watering the soil so plants can get their much needed drink.

Be sure to stay on top of weeds. We don’t want our precious plants competing with weeds for water and nutrients. That thick layer of mulch will certainly help keep weeds at bay as well. And weeds that do come up in heavily mulched beds generally have germinated in the mulch itself and will pull up very easily.

In the vegetable garden, as crops are harvested and completed bearing, be sure to keep weeds in check in areas that have been vacated. Add organic matter and keep the area mulched to be ready for fall crops that will begin going in next month.

Oh and by the way, if you have tomatoes or squash with blossom end rot on the bottom or are cracked and split toward the top, this can easily be attributed to the fluctuations in moisture.

Blossom-End Rot

Blossom-End Rot

Blossom-end rot (BER) is generally caused by a lack of calcium being taken up in the plant. Soil moisture fluctuations we have had lately can reduce the uptake of calcium in the plant and can lead to BER.

tomatocracks

Cracks in Tomatoes

The cracking is caused when the tomatoes get too much water too fast and the skin can’t stretch enough to accommodate. These are still edible by cutting off affected areas. Keep the soil consistently moist (ah, that ever important mulch can help) and both conditions can be kept under control for future harvests.

Filed Under: Gardening Tips, Newsletters

Gardening Tips for April

April 11, 2014 by lheideman

By Shirley D. Smith, Somervell County Master Gardener 

Clip art gardenerWell, spring has sprung!  I can tell by all the weeds sprouting in my yard and flowerbeds!  Yep, it’s here whether our mornings feel like it or not, which have been cool or even cold.  And, now that the growing season has begun, I would like to pass on to you a few tips to perhaps make your gardening chores a little easier. 

If you planted early (as I did), then you may be seeing bad (as opposed to good) insects.  You can wrap a piece of very sticky tape around your fingers (sticky side out) and blot off the insects.  I am going to try this on my spinach.  The aphids seem to love it. 

Here is another aphid hint:  Did you know that they are attracted to the color yellow?  Set a shallow, yellow pan of soapy water near your infested plants and the aphids will plunge to a watering end. 

If you own an aquarium (large or small) then know that the water is filled with luscious nutrients and trace elements for your plants.  Whenever you clean your aquarium, pour the old water into a bucket or watering can and use it on your plants. 

Also, save the water from the vegetables you just steamed/cooked.  Let the liquid cool, then water your plants with the broth; it’s fortified with trace elements and minerals. 

If you’ve forgotten to water a treasured plant, and it’s dry, wilted and looks hopeless (and who hasn’t done this), apologize to it, then plunge it into a bucket of warm water (higher than the rim of the pot) and allow it to soak until the bubbles stop rising.  Remove it from the water, let it drain, then set it back on a pebble-filled saucer. 

Happy Spring Gardening!


Filed Under: Gardening Tips, Newsletters

  • « Go to Previous Page
  • Page 1
  • Page 2
  • Page 3
  • Go to Next Page »

Upcoming Events

Notice
There are no upcoming events.

Get Updates

Subscribe to Our Newsletter

RSS Recent Posts

  • Poinsettias – Our Favorite Christmas Plant
  • Arbor Day Means Tree Planting in Texas
  • PWordPesticides
  • A Somervell County Master Gardeners Public Education Event

Administrator Only

  • Log in
  • Entries feed
  • Comments feed
  • WordPress.org
Texas A&M AgriLife Extension Service
Texas A&M University System Member
  • Compact with Texans
  • Privacy and Security
  • Accessibility Policy
  • State Link Policy
  • Statewide Search
  • Veterans Benefits
  • Military Families
  • Risk, Fraud & Misconduct Hotline
  • Texas Homeland Security
  • Texas Veterans Portal
  • Equal Opportunity
  • Open Records/Public Information